
Well over a year ago, as my enthusiasm for shooting cameras using film formats no longer made was hitting one of a few quirky peaks, I stumbled across an idea in a film camera forum to use 4x5 sheet film in a 122 Kodak "3A" folding camera. At the time, I was encountering only modest success with using spool adapters to use 120 film in these classic cameras, due in large part to some film plane alignment issues that resulted in soft images.
The premise of "just laying the sheet of film in the chamber" to be exposed seemed like a really nice way to get the full image size of the 122 film format on film. I rushed off to Freestyle and ordered a 25 sheet pack of their Arista sheet film.
Turns out, this idea had its share of challenges. Not only did my 122 cameras have some issues with focus collimation, but the film plane issues actually seemed to worsen by simply plopping the film in the film chamber with no way to keep the film taut. Add to it that I hadn't yet embarked on developing my own black and while film, and this was turning out to be a pretty costly "Autographic Experiment."
Fast forward a year and change, and my enthusiasm for obsolete formats hits a new peak. Add in some newly found interest in antique box cameras, and my thoughts towards resurrecting a sheet film experiment are rekindled.
The most obvious idea that occurred to me was to find some sort of 122 box camera, and load it with 4x5 film, getting the most out of the sheet film and getting an image that almost encompasses all of the generous size of the 122 format. The problem is that 122 format box cameras seemed all but non-existent, based on my searches. I did stumble across a few listings for some Conley "Kewpie" 3A cameras at some very cheap prices, so I proceeded to snap one up.
The only problem is that when my camera arrived, it was not a "Kewpie No 3A" but a "Kewpie No 3." That seemingly minor suffix letter makes a significant difference. The "No 3" is designed to take 124 film rather than the 125 film whose image size is identical to 122 film.
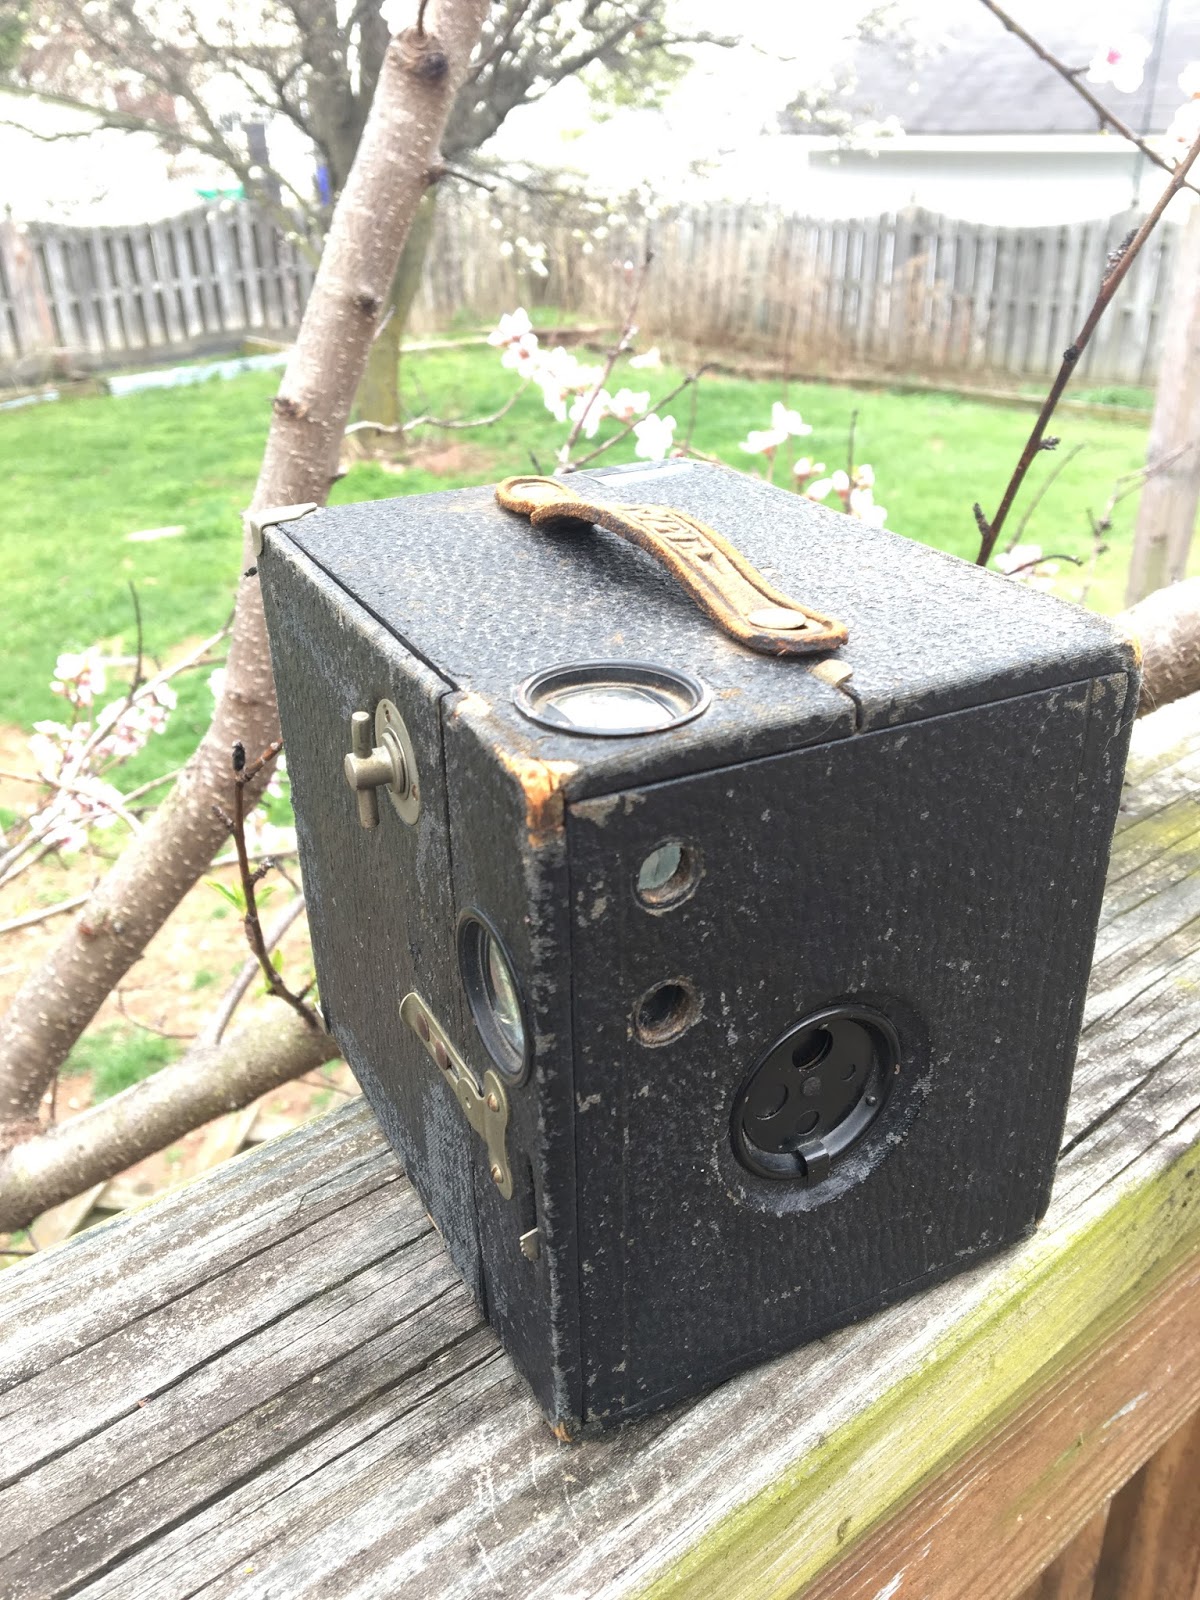
Not the prettiest of "classic" cameras is the Kewpie No 3, but this was a camera that was designed for affordability.
Disappointed though I was, the very low cost of this camera made it unfeasible to return. Besides, the camera DID work just fine, and I just happened to have a roll of 124 film picked up long ago, so there was the option of shooting it, even if developing this wider roll film would be a hassle. I could certainly spool 120 film onto a 124 backing paper, but the length of the images of 124 are identical to 116 film, so there didn't seem to be much to be gained by trying this.
With just about an hour before a little expedition, I thought upon the Kewpie still awaiting some form of assignment, and decided there was no harm in giving the camera a try with some of the sheet film I had laying about. Rather than simply plop a sheet of film in the film chamber, I cut down a sheet of black matte board to fit perfectly into the back of the Kewpie to try to keep the film flat and at the proper distance from the lens.

Prepping the Kewpie for its return to service after at least 5 decades of inactivity. The use of a black matte board along the rear of the film chamber would prove invaluable in my success!
On attempting to lay the 4x5 film into the chamber, I noticed that it was ever so slightly on the long side, so I made my best attempt to trim about 1/4 inch from its length in the dark. Finally, I found that laying the film into the chamber and getting the camera properly closed was easiest when I gently laid the film into the box camera's "innards" prior to inserting back into the outer shell. With a little bit of thought and modest effort, I had actually managed to create a single shot "large format point and shoot camera!"
Though I was shooting on a sheet of film roughly 4" wide by 4 3/4" high, the Kewpie No. 3's 124 image size is a particularly more modest 3 1/4" wide by 4 1/4" high, so the "large format" aspect of this concept is a bit of a misnomer. Still, if this worked, I would actually be able to shoot this camera at it's intended aspect ratio, something often sacrificed when improvising 120 film into a larger format. Besides, I had a distinct feeling that this nearly 100 year old camera had not had the honor of recording an image on film in more than 50 years, since the 124 format was abandoned in 1961!
Trekking out to the Washington Monument State Park near the Appalachian Trail, I elected to use my one shot on the monument itself. In lightly overcast conditions, I elected to use the widest aperture available for my shot on the Arista 100 film. I fired away and carefully got the camera back home to develop the ceremonial first shot.
Developing 4x5 film isn't quite as easy as developing roll film but is actually not as complicated as expected, thanks in large part to the "Taco method" in which a rubber band is used to curl the sheet film prior to placing in a developing tank designed for film reels. Care must be taken to ensure that the emulsion surface is fully exposed to developing chemicals, and that light can't enter the tank in the absence of developing reels. While I was able to achieve the first goal, it seems that I goofed in the second aspect.
Still, I was beyond thirlled to see that my efforts had actually paid off! After fixing and rinsing, it was a great feeling to pull out a well developed, if somewhat over-exposed image. A quick glance at the wet negative seemed to indicate I had kept the film at a more or less perfect distance from the lens, and that I'd achieved a decent level of focus across the frame!

Resulting negative after development. The challenge of trying to trim the film down in complete darkness is evident along the lower edge!
Scanning the oversized negative on a scanner designed to accept film no larger than 120 was one of my bigger worries, but I was able to circumvent this by using my "improvised" 116 film holder that I created using the same matte material as used on the back of the camera! I simply scanned top and bottom of the negative separately and stitched them together using a tool in Photoshop designed for panoramic mosaics.

Scanning a sheet film negative on a scanner designed for roll films no larger than 120 is a challenge, but entirely possible.
The result is a highly vintage looking image making full use of the 124 format's size. There is some light leakage at the bottom, but this seems more a side effect from some light leakage into the tank rather than a defect with the camera. Thankfully it doesn't destroy the image.

Yes, this IS the Washington Monument - just not THAT Washington Monument!
Welcome back to the world of shooting photos dear old Kewpie! I hope this is the start of a lovely friendship!
Great tale of overcoming obstacles and disappointments. The resulting frame really looks old.
ReplyDeleteJust yesterday a friend gave me a Conley 4x5 sheet film camera. After spending half a day on the web looking at different models, I think I have one that nobody else has- due to the placement of the shutter release and the t/i control.Unfortunately the last person to use the camera I have neglected to leave any film holders in the storage compartment on the back. Nonetheless, it's pushed me into doing research into a camera that, until yesterday, I was unaware even existed.
Great to see someone putting one of these old relics to use. Thanks for the great story.
-db